本文最后更新于 6 个月前,文中所描述的信息可能已发生改变。
🎯 探索 Vue 组件自动导入的奥秘
深入 unplugin-vue-components 源码,揭开自动导入的实现原理
在 Vue 项目开发中,我们经常会使用 unplugin-vue-components 这个插件来自动引入组件,告别繁琐的手动 import 操作。
🤔 但你是否好奇过它是如何实现的?
让我们一起拆解一下源码(以 Vite 为例),看看这个"魔法"背后的技术原理~
🏗️ 插件执行逻辑
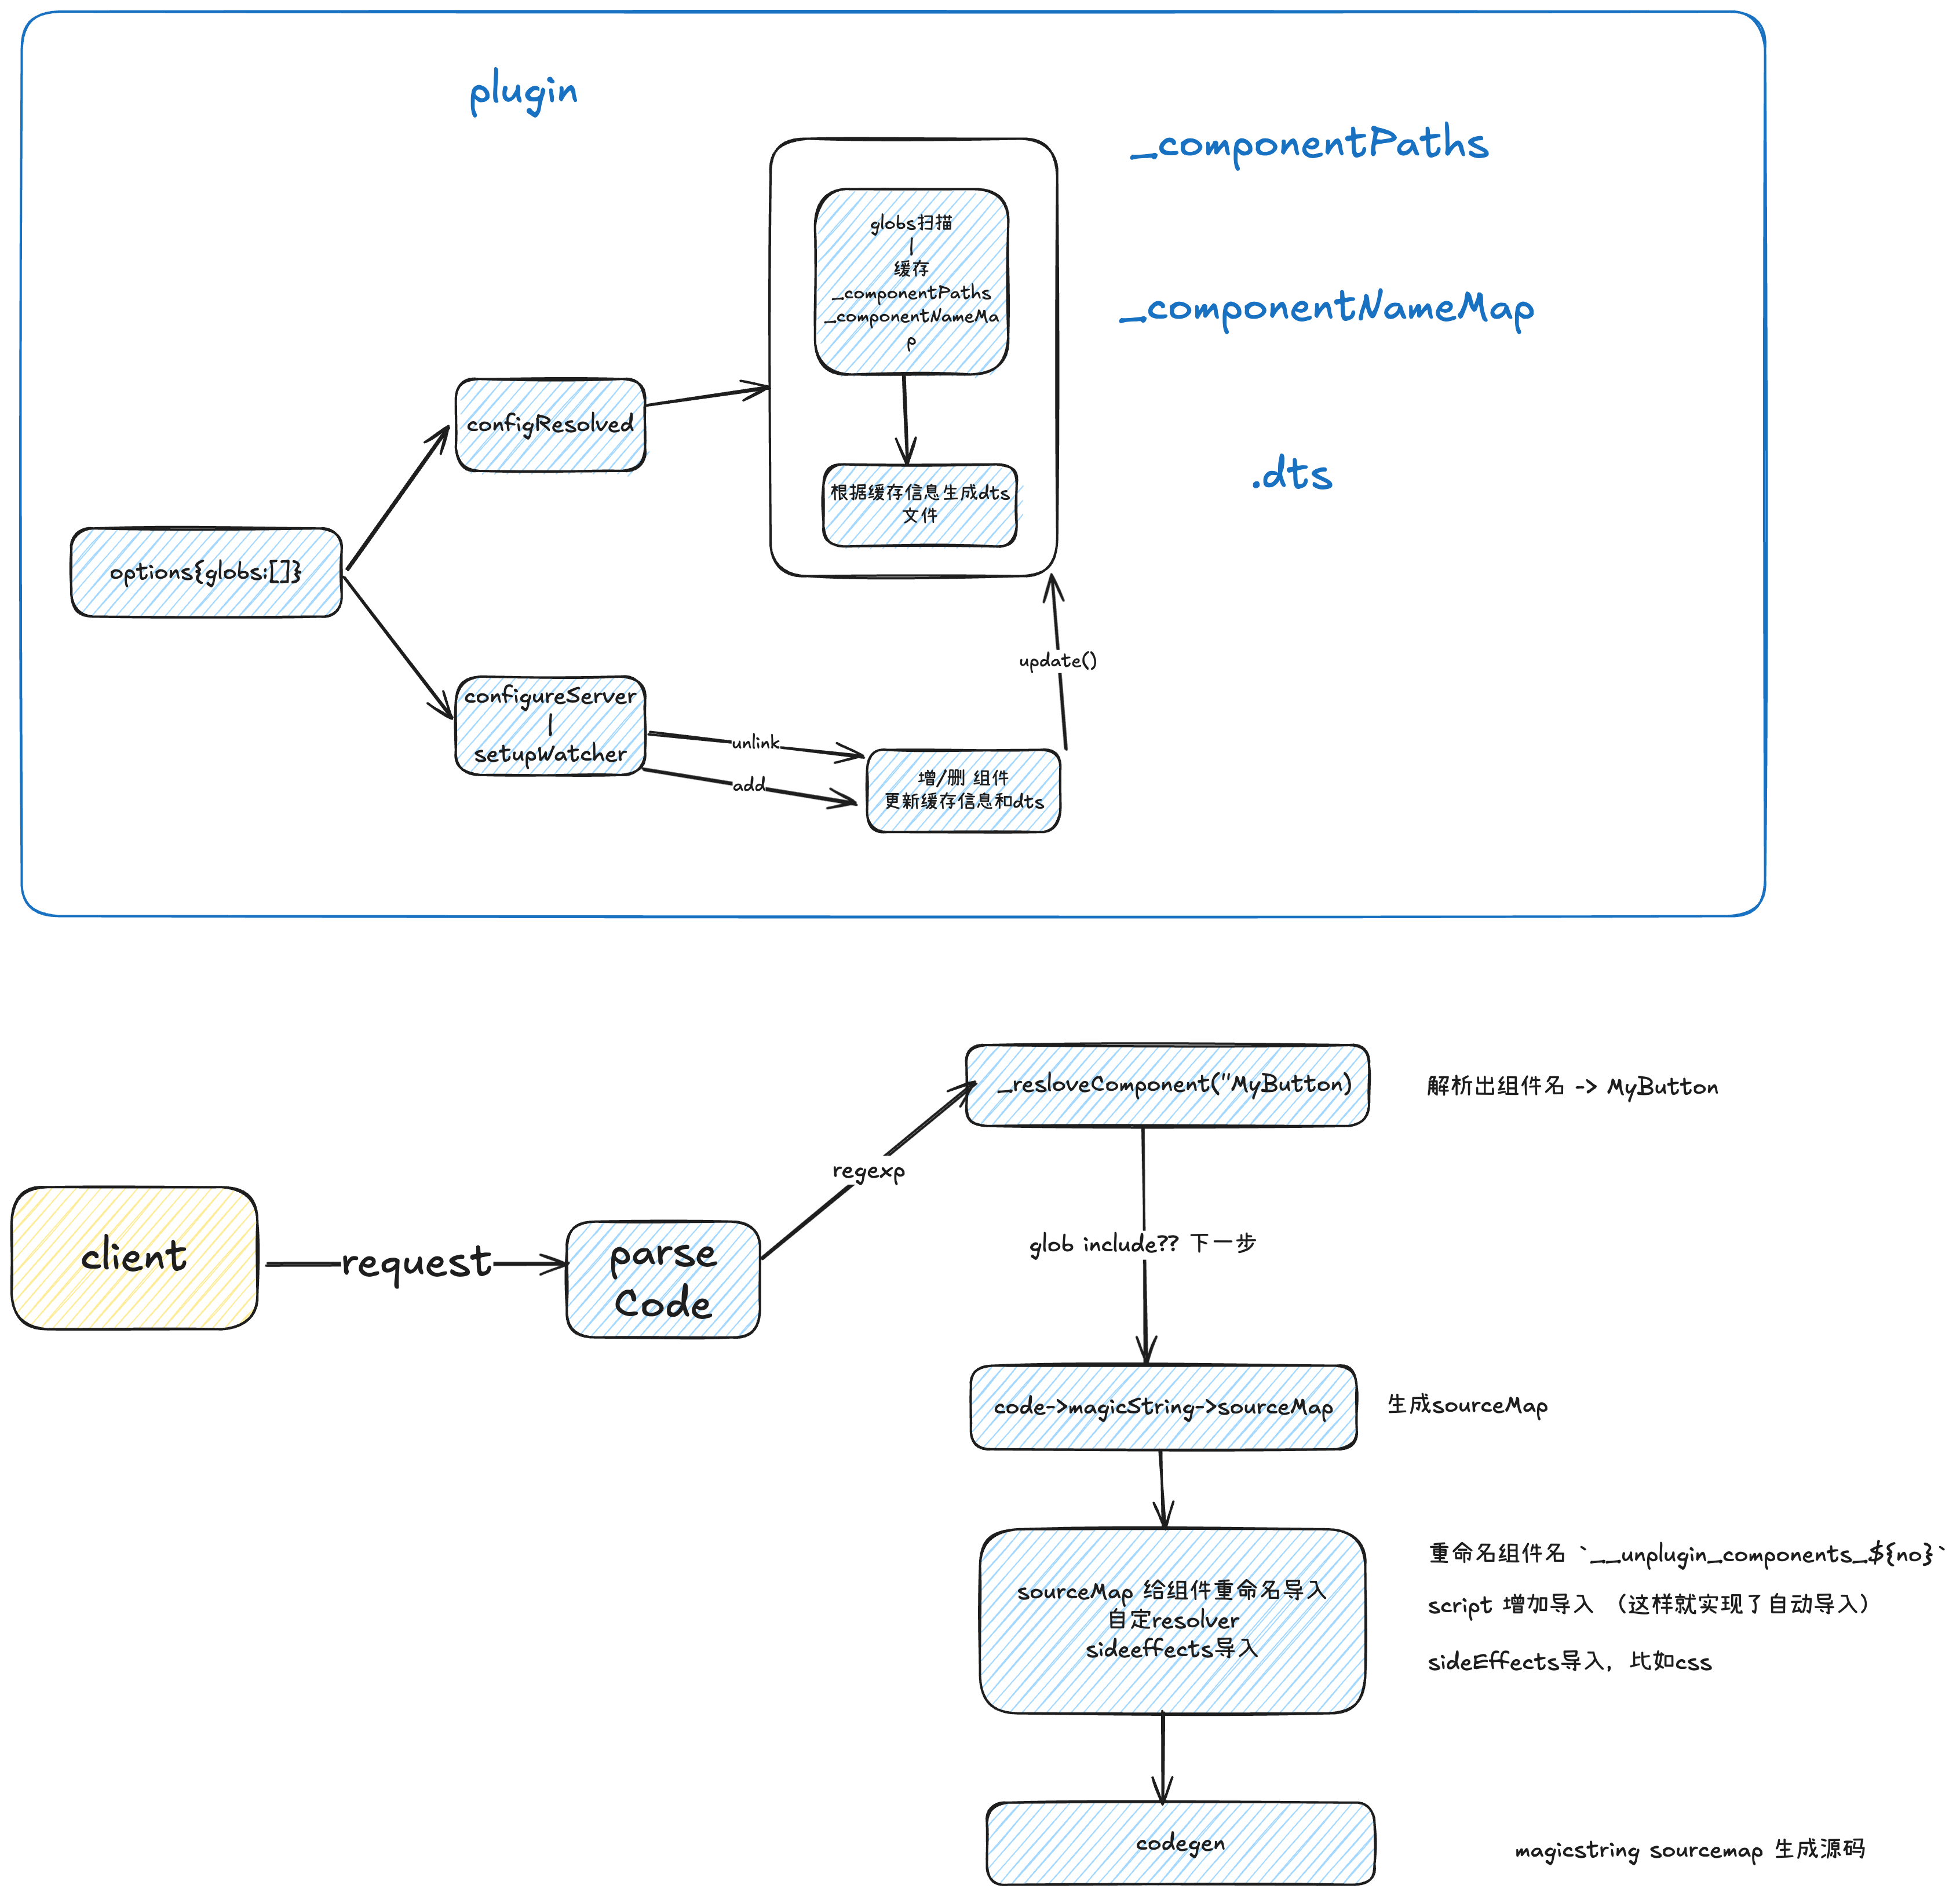
💡 核心思路
插件通过 文件扫描 → 组件注册 → 模板解析 → 自动导入 四个步骤实现组件的自动引入
在 unplugin-vue-components 中,插件的初始化通过 createUnplugin 函数实现。这个函数接收配置对象,返回插件实例。
import { createUnplugin } from "unplugin";

var unplugin_default = createUnplugin((options = {}) => {
  // 🎯 创建文件过滤器,匹配 .vue 文件
  const filter = createFilter(
    options.include || [
      /\.vue$/,
      /\.vue\?vue/,
      /\.vue\.[tj]sx?\?vue/,
      /\.vue\?v=/,
    ],
    options.exclude || [
      /[\\/]node_modules[\\/]/,
      /[\\/]\.git[\\/]/,
      /[\\/]\.nuxt[\\/]/,
    ]
  );

  // 📦 初始化上下文,管理组件信息
  const ctx = new Context(options);
  const api = {
    async findComponent(name, filename) {
      return await ctx.findComponent(
        name,
        "component",
        filename ? [filename] : []
      );
    },
    stringifyImport(info) {
      return stringifyComponentImport(info, ctx);
    },
  };

  return {
    name: "unplugin-vue-components",
    enforce: "post",
    api,
    transformInclude(id) {
      return filter(id);
    },
    async transform(code, id) {
      if (!shouldTransform(code)) return null;
      try {
        // ⚡ 核心转换逻辑
        const result = await ctx.transform(code, id);
        ctx.generateDeclaration();
        ctx.generateComponentsJson();
        return result;
      } catch (e) {
        this.error(e);
      }
    },
    vite: {
      configResolved(config) {
        ctx.setRoot(config.root);
        ctx.sourcemap = true;
        if (config.plugins.find((i) => i.name === "vite-plugin-vue2"))
          ctx.setTransformer("vue2");

        // 🎯 生成类型声明文件
        if (ctx.options.dts) {
          ctx.searchGlob();
          if (!existsSync(ctx.options.dts)) ctx.generateDeclaration();
        }

        // 📝 生成组件信息文件
        if (ctx.options.dumpComponentsInfo && ctx.dumpComponentsInfoPath) {
          if (!existsSync(ctx.dumpComponentsInfoPath))
            ctx.generateComponentsJson();
        }

        // 👀 监听文件变化
        if (config.build.watch && config.command === "build")
          ctx.setupWatcher(chokidar.watch(ctx.options.globs));
      },
      configureServer(server) {
        ctx.setupViteServer(server);
      },
    },
  };
});
🔍 执行流程概览
- 开发服务器配置解析(
configResolved) - Glob 扫描 -
ctx.searchGlob()发现所有组件 - 类型声明 - 如果开启
dts选项,生成类型声明文件 - 文件监听 - 监听组件文件的增删改
🔍 Step 1: ctx.searchGlob() - 组件发现与注册
🎯 核心目标:扫描项目中的所有组件文件,建立组件名与文件路径的映射关系
export function searchComponents(ctx: Context) {
  const root = ctx.root;

  // 🔍 Glob 扫描所有匹配的组件文件
  const files = globSync(ctx.options.globs, {
    ignore: ctx.options.globsExclude,
    onlyFiles: true,
    cwd: root,
    absolute: true,
    expandDirectories: false,
  });

  // 📦 内部注册(缓存)所有组件配置
  ctx.addComponents(files);
}

function addComponents(paths) {
  debug.components("add", paths);
  const size = this._componentPaths.size;

  // 🗂️ 缓存所有 id:path 映射
  toArray(paths).forEach((p) => this._componentPaths.add(p));
  //一开始启动服务器,size是空的,所以走到 updateComponentNameMap
  if (this._componentPaths.size !== size) {
    this.updateComponentNameMap();
    return true;
  }
  return false;
}

function updateComponentNameMap() {
  //清空 _componentNameMap,重新配置
  this._componentNameMap = {};

  Array.from(this._componentPaths).forEach((path) => {
    // 📝 根据路径解析文件名
    // 示例转换:
    // src/components/MyButton.vue => MyButton
    // src/components/MyButton2/index.vue => MyButton2
    const fileName = getNameFromFilePath(path, this.options);

    // 🔤 组件名 PascalCase 转换
    const name = this.options.prefix
      ? `${pascalCase(this.options.prefix)}${pascalCase(fileName)}`
      : pascalCase(fileName);
    //...

    //同名组件是否支持覆盖
    if (this._componentNameMap[name] && !this.options.allowOverrides) {
      console.warn(
        `[unplugin-vue-components] component "${name}"(${path}) has naming conflicts with other components, ignored.`
      );
      return;
    }

    // 💾 组件信息缓存映射
    this._componentNameMap[name] = {
      as: name,
      from: path,
    };
  });
}
✨ 处理结果
经过这一步,插件已经建立了完整的 组件名 → 文件路径 的映射表,为后续的自动导入奠定基础。
📝 Step 2: ctx.generateDeclaration() - 类型声明生成
🎯 核心目标:为自动导入的组件生成 TypeScript 类型声明文件(.d.ts),提供完整的类型支持
// 🏗️ 内部直接调用生成声明文件
function _generateDeclaration(removeUnused = !this._server) {
  if (!this.options.dts) return;
  return writeDeclaration(this, this.options.dts, removeUnused);
}

export async function writeDeclaration(
  ctx: Context,
  filepath: string,
  removeUnused = false
) {
  // 📖 读取现有声明文件内容
  const originalContent = existsSync(filepath)
    ? await readFile(filepath, "utf-8")
    : "";

  const originalImports = removeUnused
    ? undefined
    : parseDeclaration(originalContent);

  // 🔨 根据 componentNameMap 生成类型声明代码
  // 转换示例:
  // {avatar: "typeof import('./src/components/global/avatar.vue')['default']"}
  const code = getDeclaration(ctx, filepath, originalImports);
  if (!code) return;
  //dts 内容写入
  if (code !== originalContent) await writeFile(filepath, code);
}
💡 生成示例
假设有组件 MyButton.vue,会生成类似这样的类型声明:
declare module '@vue/runtime-core' {
  export interface GlobalComponents {
    MyButton: typeof import('./src/components/MyButton.vue')['default']
  }
}👀 Step 3: 文件监听 - 动态更新组件缓存
🎯 核心目标:监听组件文件的增删操作,实时更新组件缓存和类型声明文件
在开发服务器启动阶段,插件会建立文件监听机制,确保组件的变化能够及时响应。
function setupWatcher(watcher: fs.FSWatcher) {
  const { globs } = this.options;

  watcher.on("unlink", (path) => {
    //首先必须是 指定的 glob 才会监听
    if (!matchGlobs(path, globs)) return;

    path = slash(path);
    //删除了组件,则移除 ctx 中组件缓存数据
    this.removeComponents(path);
    //更新 dts
    this.onUpdate(path);
  });
  watcher.on("add", (path) => {
    //首先必须是 指定的 glob 才会监听
    if (!matchGlobs(path, globs)) return;

    path = slash(path);
    //新增了组件,则更新 ctx 中组件缓存数据
    this.addComponents(path);
    //更新 dts
    this.onUpdate(path);
  });
}
🚀 实时响应
通过文件监听,开发者在添加或删除组件时,无需重启服务器即可享受自动导入功能,大大提升开发体验。
到这里,组件扫描、类型声明生成、文件监听 三大核心机制就完成了!接下来是最关键的部分 —— 模板解析与自动导入。
⚡ Step 4: Transform - 模板解析与组件识别
🎯 核心目标:解析 Vue SFC 模板,识别使用的组件,并为其生成对应的 import 语句
这一步是整个自动导入机制的核心环节,让我们深入了解其实现原理:
function transformer(ctx, transformer$1) {
  return async (code, id, path) => {
    //已经搜索过了,次函数会被跳过
    ctx.searchGlob();
    const sfcPath = ctx.normalizePath(path);
    debug$1(sfcPath);
    const s = new MagicString(code);

    //主要关注这个函数
    await transformComponent(code, transformer$1, s, ctx, sfcPath);

    if (ctx.options.directives)
      await transformDirective(code, transformer$1, s, ctx, sfcPath);

    s.prepend(DISABLE_COMMENT);
    const result = { code: s.toString() };

    // 🗺️ 生成 Source Map
    if (ctx.sourcemap)
      result.map = s.generateMap({
        source: id,
        includeContent: true,
        hires: "boundary",
      });
    return result;
  };
}

function resolveVue3(
  code: string,
  s: MagicString,
  transformerUserResolveFunctions: boolean
) {
  const results: ResolveResult[] = [];

  //这里拿到 vuesfc 编译后的code
  //模版内:如果是组件会被 _resolveComponent 包裹
  //比如:<ComponentA/> =>   const _component_ComponentA = _resolveComponent("ComponentA");
  //可以去 sfc playground 查看编译结果

  //因此,我门可以正则匹配到组件名
  for (const match of code.matchAll(/_?resolveComponent\d*\("(.+?)"\)/g)) {
    if (!transformerUserResolveFunctions && !match[0].startsWith("_")) {
      continue;
    }
    const matchedName = match[1];
    if (match.index != null && matchedName && !matchedName.startsWith("_")) {
      const start = match.index;
      const end = start + match[0].length;
      //对组件应映射 原名 => 新名(修改sourcemap, sourcemap 可以直接生成对应源码)
      //replace 可以重命名组件,可以标识哪些组件是 uplugin-vue-components 处理的
      //后续可以基于此处理
      results.push({
        rawName: matchedName,
        replace: (resolved) => s.overwrite(start, end, resolved),
      });
    }
  }

  return results;
}
🧩 解析原理
Vue 编译器会将模板中的组件转换为 _resolveComponent 调用,插件通过正则表达式捕获这些调用,提取出组件名进行后续处理。
🎯 Step 5: 自动导入的核心实现
🎯 核心目标:基于识别的组件,生成对应的 import 语句,实现真正的自动导入
这是整个流程的最后一环,也是最精彩的部分:
async function transformComponent(
  code: string,
  transformer: SupportedTransformer,
  s: MagicString,
  ctx: Context,
  sfcPath: string
) {
  let no = 0;

  //这里 debug resolve函数
  //{rawName:string; replace:function}[]
  //results 是 一个数组,包括解析完的组件名和 sourcemap 替换函数

  const results =
    transformer === "vue2"
      ? resolveVue2(code, s)
      : resolveVue3(code, s, ctx.options.transformerUserResolveFunctions);

  for (const { rawName, replace } of results) {
    debug(`| ${rawName}`);
    const name = pascalCase(rawName);
    ctx.updateUsageMap(sfcPath, [name]);
    //根据 组件名 从一开始注册的缓存中获取组件信息 e.g:
    //{
    //  as: "ComponentA",
    //  from: "/Users/momei/code/sourceCode/unplugin-vue-components/examples/.    vite-vue3/src/components/ComponentA.vue",
    //}

    //findComponent 函数调用自定义的解析器,比如element-plus,定义导入的规则
    //比如增加side effects
    const component = await ctx.findComponent(name, "component", [sfcPath]);

    if (component) {
      // 🏷️ 生成唯一的变量名,标识为插件处理的组件
      const varName = `__unplugin_components_${no}`;
      //复写 sourcemap
      s.prepend(
        //为组件增加导入(自动导入的核心)
        //"import __unplugin_components_0 from '/Users/momei/code/sourceCode/unplugin-vue-components/examples/vite-vue3/src/components/ComponentA.vue'"

        //这里还会对 sideeffect 进行合并,比如 element-plus 的样式
        `${stringifyComponentImport({ ...component, as: varName }, ctx)};\n`
      );

      no += 1;
      // 🔄 替换原始的 _resolveComponent 调用为生成的变量名
      replace(varName);
    }
  }

  debug(`^ (${no})`);
}

function stringifyComponentImport(
  { as: name, from: path, name: importName, sideEffects }: ComponentInfo,
  ctx: Context
) {
  path = getTransformedPath(path, ctx.options.importPathTransform);

  const imports = [stringifyImport({ as: name, from: path, name: importName })];

  if (sideEffects)
    toArray(sideEffects).forEach((i) => imports.push(stringifyImport(i)));

  return imports.join(";");
}
🎉 转换结果
转换前:
const _component_MyButton = _resolveComponent("MyButton");转换后:
import __unplugin_components_0 from './src/components/MyButton.vue';
const _component_MyButton = __unplugin_components_0;
完成这一步后,SourceMap 生成最终代码,自动导入机制就大功告成了!🎊
🎯 总结
自动导入的完整流程包括:
- 🔍 组件发现:Glob 扫描,建立组件名与路径映射
- 📝 类型生成:自动生成 TypeScript 声明文件
- 👀 文件监听:实时响应组件文件的增删变化
- ⚡ 模板解析:识别 SFC 中使用的组件
- ✨ 自动导入:生成 import 语句,完成魔法转换